Sunday 29 November 2015

CTC 58 Snowflake Banner

Welcome back to another CASE-ing the catty Blog Hop.  Today I am sharing a 3d/home decor item I made many months ago for a craft show.  I make a banner every year & as soon as I saw this set I knew I would use it for my banner this Christmas.

My stamp club ladies are making this banner as part of their Christmas projects next month as well, so I have a lot of cutting & preparation to do before then!


Ugh! Banners are so hard to photograph.  I actually made the word Christmas into a banner too, but I just can't get it all in a photograph! 


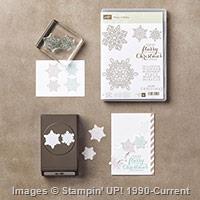
I have used the Flurry Of Wishes stamp set & stamped the snowflake images all over the Whisper white card stock in Pool Party. 


I then used White embossing powder & embossed the larger snowflake on Kraft Cardstock & punched it out using the Medallion Punch.  I love that this punch coordinates with this set too. 
You can see in the next photo I have also punched out Gold Glimmer paper & layered it behind snowflake elements to create a little embellishment for the corner.


 I really enjoyed making this.  Even though we don't get snow here I just love decorating with snowflakes.  The Snowflake Elements are so delicate & pretty & the gold looks lovely as a highlight behind them. It is really sparkly in real life but a bit hard to capture in photos.

Next up is Kathryn , click on the next button to continue on the hop.  I know she has something very special to share today.  I totally love it & I know you will too!


Thanks for stopping by
Tricia 


Friday 27 November 2015

12 Weeks Of Christmas: Week 7 Centre Step Peaceful Pines Card

Here we are at week 7 & I have a quick & easy centre step card to share with you.  I have used a favourite colour combo for this card - Soft Sky, Lost Lagoon & Pear Pizzazz. It is so easy you could whip up 10 in the one sitting.

I swore I wasnt buying the Peaceful Pines stamp set, but I secumbed to its lovely images & cute trees a week ago.  This comes as a bundle too so you can save 15% buying it that way.  The images lend themselves to a bit of bling or sparkle quite nicely.  I let the stars do all the shining on this card though.


To make the base centre step card you need to follow a bit of a tutorial.  I could write up one & share it here, but why go to all that trouble when there are plenty out there already.   I just googled centre step cards & heaps of different instructions came up.  I have used Di Barne's one for this card, but you could use whichever suits your project.  I love that Di's instructions allow for a half sheet of A4 card stock, which means I can make twice as many of these cards!  She has a printable instruction sheet on her blog & lots of other ideas too.

Thanks for stopping by
Tricia 


Built for Free Using: My Stampin Blog

Sunday 15 November 2015

CTC 56 My Favourite Holiday Catty Bundle


Welcome to the CASE-ing The Catty Blog Hop.  today we ae showcasing our favourite bundle from the Holiday Catalogue.

How do I choose just one?  There are so many I just love & I am finding it impossible to choose.  One of the very first bundles I purchased was the Snow Flurry bundle & I have made lots of projects with this bundle.  I hear you saying "SNOWFLAKES? But we don't have snow here in Australia!" Well no, we don't but I just love them so much I couldn't help myself & had to have it.


  The participants of my Create Your Christmas day recently got to make a snowflake pillow box as part of their day.  I have CASED the pillow box from page 41 as seen in the catalogue however, I wanted to use the Snowflake bundle so have added that instead of the snowflake element.

I really liked this project because I got to showcase 2 bundles!   The Snow Flurry bundle & the Pillow Box bundle.  Here is my pillow box.  Lots of punching & stamping in this project.  I love how the snowflake punch, punches out the images perfectly. The Winter Wonderland Embellishments are really lovely also.


I embossed the little stars in silver on vellum for the window cut out.  Bit hard to see in the photo above but perhaps easier to see in this one.


This little box is perfect for a little gift of jewellery or money even.  It is a good size for treats or lollies also, making this the perfect little box for so many occasions.  I have to admit I bought this bundle to make a banner to decorate my house for Christmas, but just couldn't stop using it!  I will be sharing my banner in a few weeks time so stay tuned for that.

Now for the good news, the snowflake punch is on sale this week in the weekly deals for just $23.25!
Next on the blog hop is Allison.   Be sure to click the next button to see what she has created for you.


Thanks for stopping by
Tricia 


Wednesday 11 November 2015

12 Weeks Of Christmas: Week 6 Wonderland Jolly Deer

Here we are at Week 6 of my 12 weeks of Christmas series.  Halfway there! Once again I am continuing my love affair with the Wonderland Suite.

I am a few days early with this post as I am off to the Stampin' Up! Onstage event in Melbourne this weekend.  Yay, can't wait!  We get to see the Occasions Catalogue products as well as the Sale-A-Bration ones too.

 This card is a friend to my Wonderland shaker card from an older post which you can see here.  I have been playing around with different ways to use the antler DSP from the Wonderland DSP & today I have used it on a monochrome card featuring my good friend the reindeer from Jolly Christmas!


I based this card layout on one by Allison Okamitsu.  It seems she may love this cute deer too!
When I was stamping the deer in Stazon the image was a bit sketchy, so I coloured in the extra bits using Soft Suede which gave it a lovely furry feel. The jolly is heat embossed in gold & snipped out & raised on dimensionals.  

Be sure to come back next week for my next instalment. 

Thanks for stopping by
Tricia 


Thursday 5 November 2015

12 Weeks Of Christmas: Week 5 Wonderland Glitter technique

Welcome back to Week 5 of my 12 weeks of Christmas series.  Oooh, it is getting close now can you believe how fast this year is going?!

For stamp club recently I was asked to teach the glitter technique.  It is a class I run every year as it has such a pretty effect.  Mind you I always run out of glitter!

Here is my card.  I used Wonderland & generation stamped in Mossy Meadow.


Here is a close up of the glittered panel.  It is very sparkly & pretty in real life, it's a bit hard to see in this photo.


To do this technique:
1) Stamp your images & leave to dry
2) Cover the whole image in versermark
3) Sprinkle heat & stick powder all over & heat with heat gun until powder is melted & sticky.
4) Sprinkle Dazzling Diamonds glitter all over & heat again.  Ensure the image is heated all over so the glitter sets.

This technique looks lovely on ornaments, most Christmas stamps & anything snowy.  Why not give it a try? Trust me, you'll love it!

Thanks for stopping by
Tricia